


本手册基于kubesphere3.2.0版本制作
使用6台服务器部署高可用集群
涵盖了Kubesphere平台部署,kubeedge边缘计算部署,gitlab代码管理平台部署,harbor容器管理平台,ceph分布式存储等内容
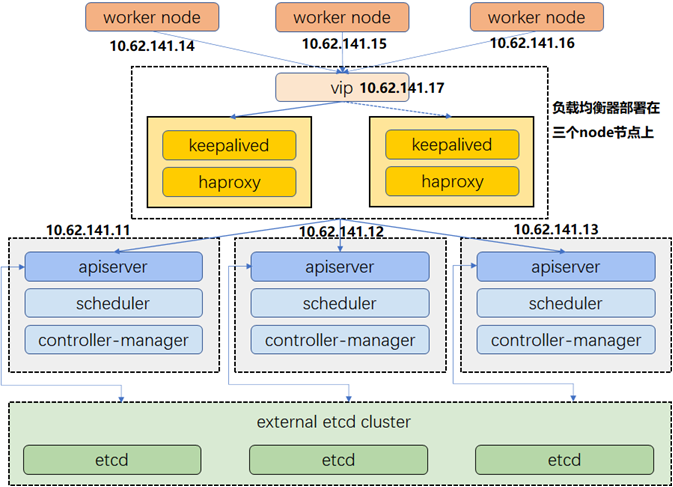
一、系统架构
二、环境准备
2.1 系统基础配置
需要修改主机名、关闭防火墙、关闭selinux、关闭swap、同步时间等
以下操作每台主机均需要操作。
# 安装wget指令
$yum install wget -y

# 关闭防火墙
$systemctl stop firewalld
$systemctl disable firewalld
$systemctl status firewalld

# 关闭selinux
$sed -i 's/enforcing/disabled/' /etc/selinux/config # 永久
$setenforce 0 # 临时
$getenforce

# 关闭swap
$swapoff -a # 临时
$sed -ri 's/.*swap.*/#&/' /etc/fstab # 永久
$free -m

# 根据规划设置主机名
$hostnamectl set-hostname master1

# 在master添加hosts
$cat >> /etc/hosts << EOF
10.62.141.11 master1
10.62.141.12 master2
10.62.141.13 master3
10.62.141.14 node1
10.62.141.15 node2
10.62.141.16 node3
EOF

# 将桥接的IPv4流量传递到iptables的链
$cat > /etc/sysctl.d/k8s.conf << EOF
net.bridge.bridge-nf-call-ip6tables = 1
net.bridge.bridge-nf-call-iptables = 1
net.ipv4.ip_forward = 1
EOF
$sysctl --system # 生效

# 时间同步
$yum install ntpdate -y
$ntpdate 10.62.133.3

# 设置每天同步一次
# 以下操作在root用户下执行
# 1、检查是否安装ntpdate时间同步客户端,查看完整路径
# whereis ntpdate
# 如路径为:/usr/sbin/ntpdate
# 2、手动同步时间
# /usr/sbin/ntpdate 10.62.133.3
# 3、定时同步时间<每日凌晨1点同步>
crontab -e
0 1 * * * /usr/sbin/ntpdate 10.62.133.3; /usr/sbin/hwclock -w
2.2 安装docker容器
所有主机均需运行
运行以下命令一键安装最新版docker。
$sudo curl -sSL https://get.docker.com | sh
$systemctl enable docker && systemctl start docker
添加镜像加速器
$sudo mkdir -p /etc/docker
$sudo tee /etc/docker/daemon.json <<-'EOF'
{
  "registry-mirrors": ["https://o8hnxeip.mirror.aliyuncs.com"]
}
EOF
$sudo systemctl daemon-reload
$sudo systemctl restart docker
2.3 安装Kubesphere依赖
所有主机均需运行
检查DNS设置
$cat /etc/resolv.conf
安装依赖
$yum install -y ebtables socat ipset conntrack
设置kubernetes仓库
$cat > /etc/yum.repos.d/kubernetes.repo << EOF
[kubernetes]
name=Kubernetes
baseurl=https://mirrors.aliyun.com/kubernetes/yum/repos/kubernetes-el7-x86_64
enabled=1
gpgcheck=0
repo_gpgcheck=0
gpgkey=https://mirrors.aliyun.com/kubernetes/yum/doc/yum-key.gpg https://mirrors.aliyun.com/kubernetes/yum/doc/rpm-package-key.gpg
EOF
$yum makecache fast
2.4 配置负载均衡器
三个node节点上运行以下命令
2.4.1 配置haproxy
$yum install keepalived haproxy psmisc -y
$vim /etc/haproxy/haproxy.cfg
haproxy.cfg文件内容如下:
global
    log /dev/log  local0 warning
    chroot      /var/lib/haproxy
    pidfile     /var/run/haproxy.pid
    maxconn     4000
    user        haproxy
    group       haproxy
    daemon

   stats socket /var/lib/haproxy/stats

defaults
  log global
  option  httplog
  option  dontlognull
        timeout connect 5000
        timeout client 50000
        timeout server 50000

frontend kube-apiserver
  bind *:6443
  mode tcp
  option tcplog
  default_backend kube-apiserver

frontend ks-console
  bind *:30888
  mode tcp
  option tcplog
  default_backend ks-console

backend kube-apiserver
    mode tcp
    option tcplog
    option tcp-check
    balance roundrobin
    default-server inter 10s downinter 5s rise 2 fall 2 slowstart 60s maxconn 250 maxqueue 256 weight 100
    server kube-apiserver-1 10.62.141.11:6443 check # Replace the IP address with your own.
    server kube-apiserver-2 10.62.141.12:6443 check # Replace the IP address with your own.
    server kube-apiserver-3 10.62.141.13:6443 check # Replace the IP address with your own.

backend ks-console
    mode tcp
    option tcplog
    option tcp-check
    balance roundrobin
    default-server inter 10s downinter 5s rise 2 fall 2 slowstart 60s maxconn 250 maxqueue 256 weight 100
    server ks-console-1 10.62.141.11:30880 check # Replace the IP address with your own.
    server ks-console-2 10.62.141.12:30880 check # Replace the IP address with your own.
    server ks-console-3 10.62.141.13:30880 check # Replace the IP address with your own.
    server ks-console-4 10.62.141.14:30880 check # Replace the IP address with your own.
    server ks-console-5 10.62.141.15:30880 check # Replace the IP address with your own.
    server ks-console-6 10.62.141.16:30880 check # Replace the IP address with your own.
运行以下命令
$systemctl restart haproxy
$systemctl enable haproxy
2.4.2 配置keepalived
$vim /etc/keepalived/keepalived.conf
内容如下,需要修改IP地址
! Configuration File for keepalived


global_defs {
   router_id LVS_DEVEL
   vrrp_skip_check_adv_addr
   vrrp_garp_interval 0
   vrrp_gna_interval 0
}


vrrp_script chk_haproxy {
    script "killall -0 haproxy"
    interval 2
    weight -100
    fall 2
    rise 2
}


vrrp_instance VI_1 {
    state BACKUP
    interface ens192
    virtual_router_id 51
    priority 160
    advert_int 1
    authentication {
        auth_type PASS
        auth_pass 1111
    }
    unicast_src_ip 10.62.141.16
    unicast_peer {
        10.62.141.14
        10.62.141.15
    }
    virtual_ipaddress {
        10.62.141.17
    }
    track_script {
        chk_haproxy
    }
}
运行以下命令:
$systemctl restart keepalived
$systemctl enable keepalived
$ip add
三、kubesphere安装
3.1 下载安装文件
使用kubekey进行安装,只需要master1上进行下载即可。
$mkdir -p /opt/kubesphere
$cd /opt/kubesphere
$curl -sfL https://get-kk.kubesphere.io | VERSION=v1.2.0 sh –
$chmod +x kk
$./kk create config --with-kubesphere v3.2.0 --with-kubernetes v1.21.5
如果无法下载,可以通过访问网址手动下载:https://github.com/kubesphere/kubekey/releases
3.2 修改配置文件
修改配置文件 $vim config-sample.yaml
内容如下:
apiVersion: kubekey.kubesphere.io/v1alpha1
kind: Cluster
metadata:
  name: sample
spec:
  hosts:
  - {name: master1, address: 10.62.141.11, internalAddress: 10.62.141.11, user: root, password: P@ssw0rd!}
  - {name: master2, address: 10.62.141.12, internalAddress: 10.62.141.12, user: root, password: P@ssw0rd!}
  - {name: master3, address: 10.62.141.13, internalAddress: 10.62.141.13, user: root, password: P@ssw0rd!}
  - {name: node1, address: 10.62.141.14, internalAddress: 10.62.141.14, user: root, password: P@ssw0rd!}
  - {name: node2, address: 10.62.141.15, internalAddress: 10.62.141.15, user: root, password: P@ssw0rd!}
  - {name: node3, address: 10.62.141.16, internalAddress: 10.62.141.16, user: root, password: P@ssw0rd!}
  roleGroups:
    etcd:
    - master1
    - master2
    - master3
    master:
    - master1
    - master2
    - master3
    worker:
    - node1
    - node2
    - node3
  controlPlaneEndpoint:
    ##Internal loadbalancer for apiservers
    #internalLoadbalancer: haproxy

    domain: lb.kubesphere.local
    address: "10.62.141.17"
    port: 6443
3.3 开始安装
运行命令,检查通过后,输入yes,开始安装
$./kk create cluster -f config-sample.yaml
等待安装完毕,过程中可以通过命令查看进度。
$kubectl logs -n kubesphere-system $(kubectl get pod -n kubesphere-system -l app=ks-install -o jsonpath='{.items[0].metadata.name}') -f
看到以下信息时,表明高可用集群已成功创建。
#####################################################
###              Welcome to KubeSphere!           ###
#####################################################

Console: http://172.16.0.4:30880
Account: admin
Password: P@88w0rd

NOTES:
  1. After you log into the console, please check the
     monitoring status of service components in
     the "Cluster Management". If any service is not
     ready, please wait patiently until all components
     are up and running.
  2. Please change the default password after login.

#####################################################
https://kubesphere.io             2020-xx-xx xx:xx:xx
#####################################################
访问网址:http://10.62.141.17:30888,登录系统
四、分布式存储ceph安装
4.1 概览
分布式存储作用:能够进行应用的动态扩容。
通过rook进行部署。
4.2 获取源码
在其中任一节点使用Git下载rook源码
$ git clone --single-branch --branch v1.5.12 https://github.com/rook/rook.git
$cd rook/cluster/examples/kubernetes/ceph
4.3 安装common及crd
运行以下命令,进行命名空间及crd相关部署
$kubectl create -f crds.yaml -f common.yaml
$kubectl get crd -n rook-ceph
4.4 安装operator
运行以下命令,进行配置文件的部署
$kubectl create -f operator.yaml
$kubectl get pods -n rook-ceph
$kubectl get cm -n rook-ceph
4.5 安装cluster集群
首先去除master节点的污点,以便osd能够调度到主节点上
去掉node-role.kubernetes.io/master,不可调度的污点
运行以下命令,进行集群部署
$kubectl create -f cluster.yaml
$kubectl get pods -n rook-ceph
集群中镜像无法下载问题,在所有节点上运行以下命令:
#!/bin/bash

image_list=(
  csi-node-driver-registrar:v2.0.1
  csi-attacher:v3.0.2
  csi-snapshotter:v3.0.2
  csi-resizer:v1.0.1
  csi-provisioner:v2.0.4
)

aliyuncs="registry.aliyuncs.com/it00021hot"
google_gcr="k8s.gcr.io/sig-storage"
for image in ${image_list[*]}
do
  docker image pull ${aliyuncs}/${image}
  docker image tag ${aliyuncs}/${image} ${google_gcr}/${image}
  docker image rm ${aliyuncs}/${image}
  echo "${aliyuncs}/${image} ${google_gcr}/${image} downloaded."
done
安装tool工具
$kubectl create -f toolbox.yaml
通过k8s服务开通nodeport,获取访问端口
通过命令查看admin用户的密码
$kubectl -n rook-ceph get secret rook-ceph-dashboard-password -o jsonpath="{['data']['password']}" | base64 --decode && echo
4.6 添加存储类到Kubesphere
在其中任一节点,运行以下命令,添加存储类
$kubectl create -f csi/rbd/storageclass.yaml
$kubectl get sc
五、边缘计算Kubeedge安装
5.1 概览
华为kubeedge平台将云计算延伸到边缘端。Kubeedge已经集成到Kubesphere中,只需要启用即可。
5.2 安装准备
注意:去掉master节点的污点!
边缘端加入kubeedge需要通过10000-10004等端口,需要进行端口转发及负载均衡配置。在三个工作节点node1-node3上修改haproxy配置
$vim /etc/haproxy/haproxy.cfg
$systemctl restart haproxy

# 分别增加kubeedge 0-4

frontend kubeedge-4
    bind *:10004
    mode tcp
    option tcplog
    default_backend kubeedge-4

backend kubeedge-4
    mode tcp
    option tcplog
    option tcp-check
    balance roundrobin
    default-server inter 10s downinter 5s rise 2 fall 2 slowstart 60s maxconn 250 maxqueue 256 weight 100
    server kubeedge-4-1 10.62.141.11:30004 check # Replace the IP address with your own.
    server kubeedge-4-2 10.62.141.12:30004 check # Replace the IP address with your own.
    server kubeedge-4-3 10.62.141.13:30004 check # Replace the IP address with your own.
    server kubeedge-4-4 10.62.141.14:30004 check # Replace the IP address with your own.
    server kubeedge-4-5 10.62.141.15:30004 check # Replace the IP address with your own.
    server kubeedge-4-6 10.62.141.16:30004 check # Replace the IP address with your own.
5.3 安装kubeedge
使用 admin 用户登录控制台。点击左上角的平台管理,然后选择集群管理。
点击 CRD,然后在搜索栏中输入 clusterconfiguration。点击搜索结果查看其详情页。
kubeedge:
    cloudCore:
      cloudHub:
        advertiseAddress:
          - '10.62.141.17'
        nodeLimit: '100'
      cloudhubHttpsPort: '10002'
      cloudhubPort: '10000'
      cloudhubQuicPort: '10001'
      cloudstreamPort: '10003'
      nodeSelector:
        node-role.kubernetes.io/worker: ''
      service:
        cloudhubHttpsNodePort: '30002'
        cloudhubNodePort: '30000'
        cloudhubQuicNodePort: '30001'
        cloudstreamNodePort: '30003'
        tunnelNodePort: '30004'
      tolerations: []
      tunnelPort: '10004'
    edgeWatcher:
      edgeWatcherAgent:
        nodeSelector:
          node-role.kubernetes.io/worker: ''
        tolerations: []
      nodeSelector:
        node-role.kubernetes.io/worker: ''
      tolerations: []
    enabled: true
修改完成后,确定进行系统安装更新,过程中可以通过命令查看进度。
$kubectl logs -n kubesphere-system $(kubectl get pod -n kubesphere-system -l app=ks-install -o jsonpath='{.items[0].metadata.name}') -f
后续可通过kubectl -n kubeedge edit cm cloudcore修改公共IP,
kubectl -n kubeedge edit cm edge-watcher 修改edgewatch IP
5.4 树莓派加入kubeedge
树莓派需要安装arm64位的系统,安装docker环境,修改环境。
$vim /boot/cmdline.txt
# 添加内容
console=tty1 root=PARTUUID=9f7945f8-02 rootfstype=ext4 elevator=deadline fsck.repair=yes cgroup_memory=1 cgroup_enable=memory rootwait quiet splash plymouth.ignore-serial-consoles

$cat /proc/cgroups
# 重启系统成功
配置edgemesh
$vi /etc/nsswitch.conf
添加内容
hosts: dns files mdns4_minimal [NOTFOUND=return]

$sudo echo "net.ipv4.ip_forward = 1" >> /etc/sysctl.conf
$sudo sysctl -p | grep ip_forward
从Kubesphere获取加入命令
$arch=$(uname -m); curl -LO https://kubeedge.pek3b.qingstor.com/bin/v1.7.2/$arch/keadm-v1.7.2-linux-$arch.tar.gz && tar xvf keadm-v1.7.2-linux-$arch.tar.gz && chmod +x keadm && ./keadm join --kubeedge-version=1.7.2 --region=zh --cloudcore-ipport=10.62.141.17:10000 --quicport 10001 --certport 10002 --tunnelport 10004 --edgenode-name edgenode-mr02 --edgenode-ip 10.62.131.99 --token 5fd8f963af8c068db9e015c4fa38bd89954c7fd8b9822347725be0368b56c937.eyJhbGciOiJIUzI1NiIsInR5cCI6IkpXVCJ9.eyJleHAiOjE2MzcyOTg0MDh9.ipF1FabJJ4R3j8MlEjKH5pfjcaXjK7aa-MwX5d_H3II --with-edge-taint
因网络问题无法下载keadm,请自行到:https://github.com/kubesphere/kubeedge/releases
下载对应版本文件,放置到树莓派,解压,运行加入指令,加入kubeedge。
六、容器平台harbor安装
6.1 概览
harbor提供私有化的容器平台,用于存储自定义容器。
6.2 安装
kubesphere应用商店提供harbor应用,可通过应用商店直接安装部署。
七、代码管理平台gitlab安装
7.1 概览
gitlab私有云的代码管理功能,可通过部署实现开发协同,问题记录等。
7.2 安装
gitlab中文版安装如下
$docker pull beginor/gitlab-ce:11.0.1-ce.0
$docker run
    --detach
    --publish 8443:443
    --publish 8090:80
    --name gitlab
    --restart unless-stopped
    -v /mnt/gitlab/etc:/etc/gitlab
    -v /mnt/gitlab/log:/var/log/gitlab
    -v /mnt/gitlab/data:/var/opt/gitlab
    beginor/gitlab-ce:11.0.1-ce.0
修改/mnt/gitlab/etc/gitlab.rb
把external_url改成部署机器的域名或者IP地址
vi /mnt/gitlab/etc/gitlab.rb
将external_url ‘http://192.168.125.126’
修改/mnt/gitlab/data/gitlab-rails/etc/gitlab.yml
vi /mnt/gitlab/data/gitlab-rails/etc/gitlab.yml
找到关键字 * ## Web server settings *
将host的值改成映射的外部主机ip地址和端口
重启docker容器
先停止该容器,删掉该容器信息,重启完docker之后,重新运行GitLab容器
gitlab的web管理页面就可以正常访问
评论区